February 13, 2016
Before and After
Originally published April 19, 2005
Image Credit: Chris Graham |
|
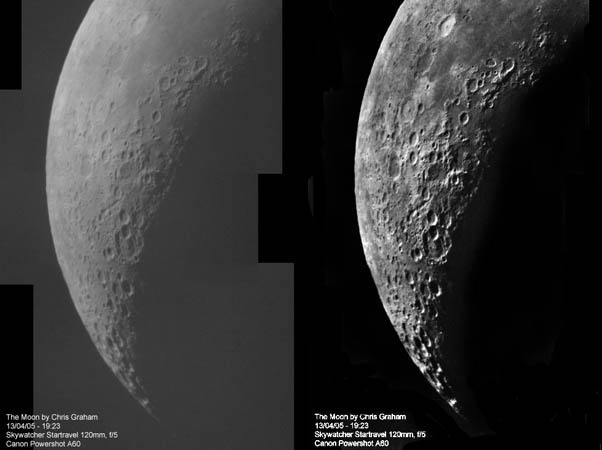
Before and After Hundreds, perhaps thousands, of amateur astronomers use digital cameras to image the Moon. Chris Graham has done this with a standard 5 telescope and a Canon Powershot camera and achieved relative success (left) an image that is reasonably sharp and shows all the main craters. But clicking the camera at the eyepiece is only the first step in extracting all the information from an image and converting it into an attractive presentation. In this case, the image is flat it has a limited tonal range with no pure whites or deep blacks. Using Photoshop Elements (a relatively cheap program with excellent capabilities for image processing) I have enhanced Chris image to create a more dramatic version (right) that has a more complete tonal range. I used the Filter Unsharp Mask command to increase tonal range across the image, but this lightened the limb. Next I used Enhance Brightness and Contrast to boost the contrast - getting bright whites and blacks. Finally, I daubed the bright limb with the Burn Tool to darken the limb. To make the image more attractive the Eraser Tool made most of the sky black, and then the Burn Tool feathered the edges of the black around the bright Moon. It takes more time to explain than to do, but nearly all images can be improved 10-50% by simple manipulations. I always start with Unsharp Mask which performs magic! Try it on your images. Oh, one more correction is necessary - did you notice that this image has east and west flipped? Your telescope/camera optics may do that, but for comparison with maps and other images it's best to arrange with E to the right and N up. Technical Details: Yesterday's LPOD: The Lunar Crater Wood Tomorrow's LPOD: Almost Classic Crater |
|
Author & Editor: COMMENTS?Register, Log in, and join in the comments.
|


